So you are wondering what to do since your Seatpost doesn’t fit your bicycle or wish to use one Seatpost between two or more bikes with different seat tube diameters? Worry not; a Seatpost shim can solve this predicament, but before you take a sigh of relief, ask yourself, are Seatpost shims safe?
Seatpost shims are safe if their length is at the very least the same as the minimum length of insertion length needed by the Seatpost. Ensure the shim is the correct size for optimum stiffness. Moreover, the Seatpost’s bottom should be beyond the top tube and the seat tube’s connecting point.
A shim is a cost-effective option when you don’t want to purchase a new Seatpost that fits your bike well, or your budget doesn’t allow you to do so.
What Is A Seatpost Shim?
Before tackling the core of this post, “are Seatpost shims safe?” and exploring how they work, you ought to know what a shim is.
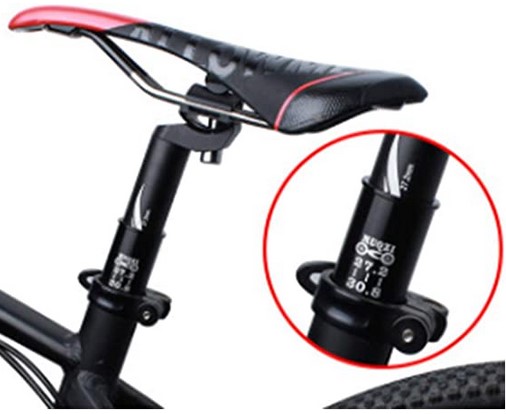
A shim is a piece of bike equipment typically made of steel, PVC, or aluminum that you can wrap around your bicycle’s Seatpost to raise its diameter, making it thicker. With a shim, you can fit a Seatpost into a bike frame of any size.
It helps your Seatpost fit into the bike’s seat tube by filling the space between Seatpost’s outer diameter and the frame’s inner diameter.
Are Seatpost Shims Safe?
A shim will work well and safely on your bicycle if you make sure it is longer or a similar length to the least insertion length of the Seatpost. The insertion point safeguards the frame and Seatpost from cracking; hence it’s paramount that you adhere to this requirement for the safety of your bicycle.
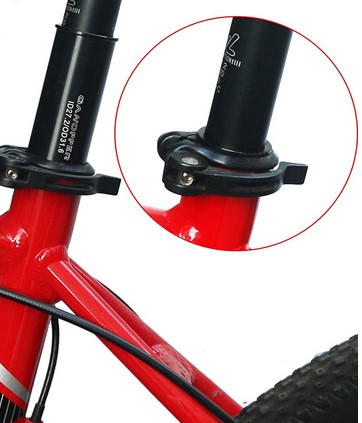
Bike frames typically have the least insertion points, but it is considerably shorter than Seatpost’s minimum length of insertion. This is why your Seatpost shim will be safe if it extends past the point of contact between the bike’s top tube and seat tube.
Remember that your frame can’t differentiate between a Seatpost with a shim from one without. Therefore, you don’t have to spend your hard-earned money to get a new Seatpost to solve a problem that a shim can solve.
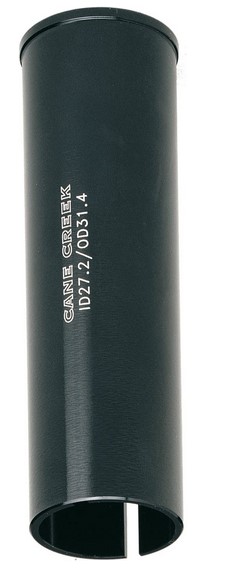
It would be best to get a shim with a lip like Fouriers Seatpost Shim (Amazon Link) to prevent the sleeve slipping into the seat tube. Fouriers shim is a worthy purchase for a cyclist looking to change a 31.6 mm Seatpost to a 30.9 mm seat tube.
This lightweight, 90mm long shim made of AL6061-T6 Aluminum alloy is suitable for different bicycles, including mountain bikes and road bikes.
How Do You Install A Seatpost Shim?
As mentioned earlier, a shim allows you to use one Seatpost on various bike frames. You can do this by wrapping it around your bicycle Seatpost to make it thicker or wider, allowing you to sit comfortably and securely on your bike.
It is relatively straightforward to install a Seatpost shim on your bike. Do so by:
- Grease the contact area between the Seatpost and seat tube if you have an aluminum or steel-made Seatpost. If your Seatpost is carbon-made, apply the shim’s inner part with carbon paste.
- Slide the Seatpost into the shim until the upper part reaches the part of the Seatpost that’ll be visible on the frame’s exterior.
- Apply the shim’s exterior with grease if you have a steel frame and manufacturer-recommended lube for a carbon frame.
- Insert the Seatpost into the frame, ensuring your seat is well-aligned. In addition, tighten the collar to the manufacturer’s instructions, especially if it’s a carbon Seatpost. This is because it can crush under too much clamping force.
How Do You Make A Bike Seatpost Shim? (DIY Seatpost Shims)
You can make a Seatpost shim from your home using aluminum beverage cans like beer or soda cans. This is because they are easy to cut using scissors or a knife, and their thickness is 0.1 mm.
Follow these steps to make your DIY Seatpost shim.
- Put on gloves, then cut the bottom and top of an empty aluminum can with sharp scissors or knife.
- Create a thin aluminum roll by slicing down one side of the cylinder.
- Without the shim, slide the Seatpost into your bicycle’s frame to mark your perfect saddle height.
- Apply a thin grease layer to the inner frame and the Seatpost.
- Fold the shim tightly around the Seatpost, ensuring you achieve flat edges. The shim’s upper edge should sit at the mark you made earlier to make sure the shim is completely clamped between the seat tube and Seatpost when you secure it. Ensure the shim stays close to the seat tube’s top after tightening the post collar because this is where you need to fill the gap. Doing so will prevent it from slipping.
- Align the Seatpost shim at the seat tube’s top using a screwdriver blade. At the same time, slip it into the bike’s frame.
- Lastly, fasten the post clamp.
DIY Seapost Shim Disadvantages
Although the thought of making your Seatpost shim sounds exciting and cost-effective, this option comes with its drawbacks. They are:
1. Rough Edges
You will likely be left with rough edges when you cut aluminum can or PVC to make a Seatpost shim. This can compromise your safety by putting you at risk of injuries like cuts.
The rough edges also make it hard to lubricate the shim.
Note that these issues don’t render DIY shims useless. However, be careful when making one and fitting it into your bicycle.
Alternatively, you could go for a high-quality, well-made commercial Seatpost shim like Cane Creek Seatpost 28.6-31.6mm Shim (Amazon link) It has a superior finish and fit that changes a 27.2mm Seatpost to a 28. 6 to 31.6mm Seatpost.
2. No Stop Lip
DIY Seatpost shim won’t have a stop lip; thus, it can easily slip down to the seat tube. To avoid this problem, buy a shim; after all, it doesn’t cost a fortune.
3. Less Aesthetically Appealing
Don’t expect a DIY shim to compete with a commercial shim when it comes to appearance. You can ruin your makeshift Seatpost shim’s aesthetics if you cut the can wrong and also when fitting it.
Do Seatpost Shims Work?
Seatpost shims are effective if you get the correct size for your bicycle and avoid doubling up.
As discussed above, you can either buy one or go the DIY route, but I recommend purchasing because such Seatpost shims are safe, offer better quality and service than their DIY counterparts.
DIY shims provide a temporary fix. Therefore, consider buying one if you want a more permanent solution.
You also need to take into account the pros and cons of Seatpost shims because they give you a clear picture of what to expect.
The Benefits of Seatpost Shims
1. Facilitate Seatpost Swapping
Getting more Seatposts may sound like the obvious choice when you have two or more bikes with differently sized seat tubes to accommodate each bicycle.
However, a shim presents a more convenient alternative that lets you use one Seatpost on all your bicycles. You get to swap between them depending on which bike you wish to ride at what time.
2. Save You Money
Instead of spending up to 100s of dollars on a new Seatpost, you can invest in a shim and continue using your old one. The shim will ensure the smaller-sized Seatpost will fit into the seat tube snugly.
3. They Make Unusual Size Combinations Work
With a shim, you can fit together a Seatpost and seat tube with unusual diameters. This is because the shim will increase the Seatpost’s diameter, making it sit tight in the seat tube.
4. Allow You To Use Differently Sized Seatposts
Since Seatposts are diversely sized, not many of them will be the right fit for your bicycle.
However, with a shim, the number of Seatposts you can use on your bike increase. Thus, you can try different models, enjoy discounts, and even find a Seatpost that’s most comfortable for you.
The Downsides Of Seatpost Shims
1. Poor Aesthetics
Although shims are barely visible once fitted into the bicycle, some people still find them unappealing. It’s even worse with DIY shims because they tend to have rough edges.
2. Inconvenience When Adjusting The Seatpost Height
It can be quite unpleasant if you have a shim and tend to adjust your Seatpost height regularly. This is because it presents one more thing to handle.
3. Extra Maintenance
Unlike a shim-less Seatpost that only needs a single layer of lube, a Seatpost with a shim needs lubricant on both sides.
4. Loss Of Warranty
You risk losing your warranty if you put a shim on your bike.
FAQs
1. Can You Use A Shim With A Dropper Post?
You can use a shim on a dropper post as it will work well to help you customize it. It does this by lowering the post’s travel and extended length.
Ensure you find a shim that will function well with your dropper post and bicycle.
2. What Is A Seatpost Shim Used For?
A Seatpost shim is used to raise the diameter of a Seatpost so that it can fit into a bicycle with a wider seat tube. It allows you to use one Seatpost on numerous frame sizes.
3. Is It OK To Use Seatpost Shim?
It is okay to use a Seatpost shim on your bicycle, but make sure it is the correct size. Additionally, it should be at least as long as the Seatpost’s minimum point of insertion.
4. Can You Shim A Seatpost?
You can shim your bike’s Seatpost if it has a larger inner seat tube diameter than the Seatpost’s exterior diameter. A properly sized shim will take up the additional space, helping you achieve a correct fitting.
5. How Do You Use A Seatpost Shim?
You can use a Seatpost shim by attaching it to your bicycle’s Seatpost to increase its diameter to make it fit into the seat tube diameter. You will need to lubricate it first, ensure its upper edge is on your ideal saddle height, and tighten properly.
Final Take
So, are Seatpost shims safe? The safety of your Seatpost shim depends on its length and how you install it. Generally, longer shims are safer.
Additionally, you are better off purchasing a Seatpost shim than making one because they are safer, especially those with stop lips.
Also Read: